Computer keepalive

Sometimes, you want to keep your system alive. This little blog post see how you can make virtual mouse which move automatically according with a start/stop button. This article explains the concept and practical way to create your own device. There is more than one way, but I explain only what I do. For demonstration of prototype board, look the video below.
This is based on ATtiny85. The board could be «Adafruit Trinket - Mini Microcontroller - 5V» or «Digistump - Digispark micro USB Development Board» for prototyping and «Digistump - Digispark USB Development Board» for production ready device You can easily find these devices for little on money on Amazon or something like that.
 2inches switch
 Prototype board
I use «micronucleus» bootloader in order to program easily the ATtiny85 using Arduino IDE and USB connexion. Probably the device you buy was not provided with micronucleus, so we have two way:
- program the device with embedded bootloader
- program the device with ISP programmer, I use a «Buspirate» as ISP programmer.
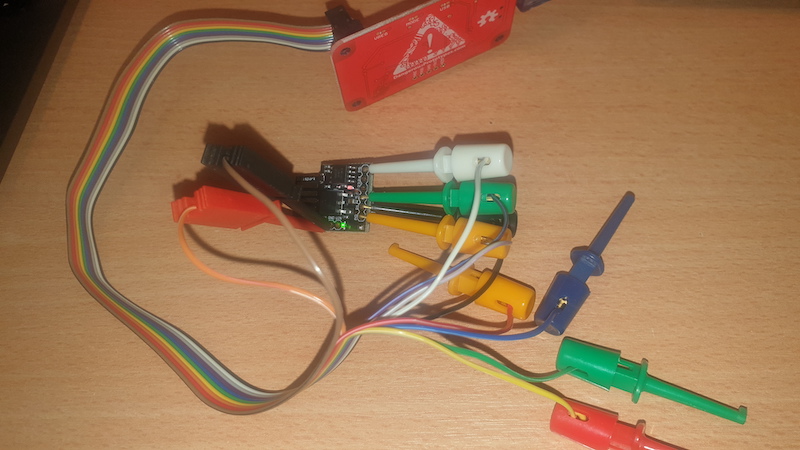 Programming with buspirate
The final device must be compact and easy to use. It could be better to solder the button on the board. The GPIO pins have standard space of 0.1 inch or 2.54mm. I use switch button with only two pins spaced by 0.2 inches.
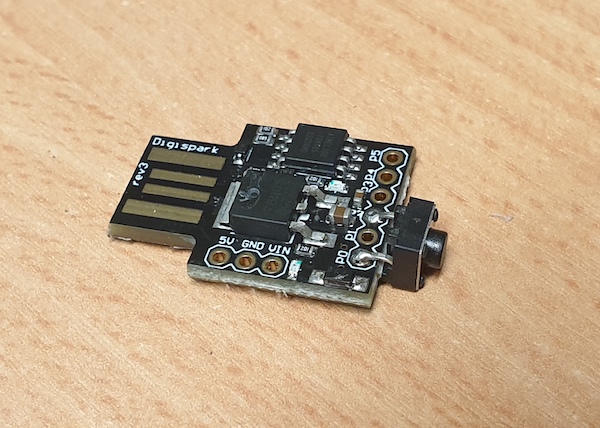
 Digispark pinout
You can find below some links to the components I use. Note these link points to the right but not to the lowest price
- Adafruit Trinket - Mini Microcontroller - 5V - https://www.adafruit.com/product/1501
- Digistump - Digispark USB Development Board - http://digistump.com/products/1
- Button - https://www.amazon.fr/Youmile-Broches-6x6x5mm-Momentary-Tactile/dp/B07XWYHPZH
- Buspirate 3.6 (must be < 4) - https://www.amazon.fr/Seeedstudio-Pirate-universal-serial-interface/dp/B011G6QQQI
- ATtiny85 datasheet - https://ww1.microchip.com/downloads/en/DeviceDoc/Atmel-2586-AVR-8-bit-Microcontroller-ATtiny25-ATtiny45-ATtiny85_Datasheet.pdf
Below the schema of Digistump board plus the start/stop button.

The ATtiny85 has no specific embedded module to drive USB signals. The solution is using software stack. The most popular stack is v-usb (https://www.obdev.at/products/vusb/index.html). Don't worry, the Arduino IDE environment package all the necessary for this usage.
Install the Arduino IDE (https://www.arduino.cc/en/software), go to the board manager ( [Tools] → [Board] → [Boards manager] ), search and install the «Digistump AVR Boards». This install also Digistump libraries, including mouse library. Start new stekch and select the board «Digispark (default 16.5MHz)». It works on MacOS and Linux, probably also on Windows.
The only aligned pin on the board are I/O pin, so the button is solder between two pins. To avoid external component, we configure one of the two pins as input pullup and the other as digital out set to low state (aka GND). According with available pin the only usable pin for button are #0, #2 and #5. #0 and #2 are spaced by 2 inches.
 Final prototype
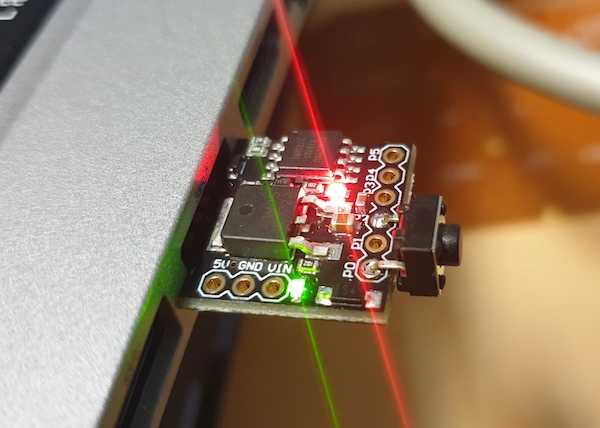 Final prototype at work
The basic program is very simple: init pins, init usb. When pressure is detected on the button, swap mouse move state. The mouse directives send command to draw a circle.
If you want to modify the program behavior, note when you want a pause, you must use the function DigiMouse.delay(). This function waits a bit, but maintain USB signals alive. The most complex part of the program is the most useless : the mouse cursor describe a circle. I cut the circle along its horizontal and vertical symmetries and I get an arc. The arc as a 45° symmetry, so the step for X moves (below in blue) are the same than the step for Y moves (below in pink), but in reverse order. I describe only these steps, and I change the browsing order of the step and their sign according with the quarter drawed. The step are an integer approximation of the real circle points positions.


Here the program
#include <DigiMouse.h>

#define PIN_GND    0
#define PIN_LED    1
#define PIN_BUTTON 2
#define PIN_USB_DM 3
#define PIN_USB_DP 4

char mode = LOW;

/* circle approximation - just a quarter */
char steps[] = { 8, 8, 7, 6, 6, 5, 4, 3, 2, 1 };
char ctr = 0;
char phase = 0;

void setup() {
  int i;

  /* COnfigure I/O and USB */
  pinMode(PIN_BUTTON, INPUT_PULLUP);
  pinMode(PIN_GND, OUTPUT);
  pinMode(PIN_LED, OUTPUT);
  digitalWrite(PIN_GND, LOW);

  /* Make enlighted for 1s, waitting fir usb wire connected after alim connected */
  digitalWrite(PIN_LED, HIGH);
  delay(1000);

  /* Configure mouse */
  DigiMouse.begin();

  /* Blink led to announce start */
  for (i = 0; i < 5; i++) {
    digitalWrite(PIN_LED, LOW);
    DigiMouse.delay(50);
    digitalWrite(PIN_LED, HIGH);
    DigiMouse.delay(50);
  }
  digitalWrite(PIN_LED, mode);
}

void loop()
{
  char i;
  char idx_x;
  char idx_y;

  if (mode == HIGH) {

    /* Move mode */

    /* compute x and y move steps */
    switch (phase) {
    case 0:
      idx_x =   steps[     ctr];
      idx_y =   steps[10 - ctr];
      break;
    case 1:
      idx_x = - steps[10 - ctr];
      idx_y =   steps[     ctr];
      break;
    case 2:
      idx_x = - steps[     ctr];
      idx_y = - steps[10 - ctr];
      break;
    case 3:
      idx_x =   steps[10 - ctr];
      idx_y = - steps[     ctr];
      break;
    }

    /* send steps to the mouse */
    DigiMouse.moveX(idx_x);
    DigiMouse.moveY(idx_y);

    /* increment counter and phase */
    ctr++;
    if (ctr== 10) {
      ctr = 0;
      phase++;
      if (phase == 4) {
        phase = 0;
      }
    }
  }

  /* USB delay */
  DigiMouse.delay(20);

  /* If the button is not pressed do nothing */
  if (digitalRead(PIN_BUTTON) == HIGH) {
    return;
  }

  /* Wait for button release, to avoid bouncing */
  while (digitalRead(PIN_BUTTON) == LOW) {
    DigiMouse.delay(50);
  }

  /* Swap "mouse move" on/off */
  if (mode == LOW) {
    mode = HIGH;
  } else {
    mode = LOW;
  }

  /* Display led according with "mouse move" state */
  digitalWrite(PIN_LED, mode);
}
From unknown reason the virtual mouse work fine on Windows, but not on MacOS. When the ATtiny85 contains the micronucleus bootloader + the program it works sometimes on MacOS, when the program is burned directly (using ISP) on the ATtiny85, it never works on MacOS.
To improve start time of the device, I prefer programming the device with buspirate and ISP in place of programming through micronucleus USB way.
I found this article which describe the same goal, but using other way and other tools : https://ericdraken.com/usb-mouse-jiggler/